Thursday, December 31, 2015

Mushroom post 2 - detailed instructions

As I wrote in the first installment of the mushroom post, a few weeks ago I purchased an indoor mushroom kit (king oysters). I intend to propagate this kit, so that I can enjoy these mushrooms as long as I possibly can forever.

Reading up, I came across several approaches to mushroom propagation. I'm not 100% sure which will work best for me, so these are the experiments I will set up:

1. Stem butt propagation - to make new mycelium from a single mushroom, follow this video or the     step-by-step instructions in this webpage. Should work well for oysters, king oysters, and morels.     While in the video the mushroom is peeled and the stem is sliced, most websites (and the Russian       folklore) tell you to use the very bottom of the stem as-is, rather than peeling it. If this works, the       next step is just as described for the mycelium propagation approach below - new substrate,   
  humidity.           
  This step requires only corrugated cardboard and an air-tight container.

Morel anatomy. From http://www.waldeneffect.org/
2. Propagation of the mycelium - as opposed to the previous approach, where the actual fruiting body     of the mushroom is used, this approach uses the mycelium itself. This is the      
    stuff growing inside of the mushroom kit. Once the first flush of mushrooms passes, I will take out     some of the mycelium from the mushroom kit, and will inoculate a new container filled with     
    pasteurized substrate (see #3 for substrate choices). The general approach seems to be 500 g    
    spawn for every 2.5 kg of moist substrate (based on here). I will be using the bucket approach.   

    Here is another bucket tutorial, on coffee substrate. Don't have buckets? Use any other container 
    with existing holes (like a laundry basket) or pre-drilled holes, and place it in an intact tote, or even     a large plastic bag. Beautiful pictures with step-by-step instructions here, just click on the "+" 
    sign of each step. And yet another tutorial, covering growing mushrooms on straw, with step-by-       step instructions, using only plastic bags.
3. Substrate choices - from what I have read, oysters (and king oysters) will be happy on coffee    
    grounds and straw; shiitake (unless specifically the straw strain) will want a mix of hardwood    
    sawdust and straw, and cinnamon caps will require sawdust

Since I have available wood shavings, and should also be able to find straw, I'm planning on setting up four growing experiments: 1) stem propagation on corrugated cardboard, 2) mycelium propagation on coffee grounds, 3) mycelium propagation on straw, and 4) mycelium propagation on a mix of wood shavings and straw. In the next few weeks, I should be able to start all of these. I will be taking pictures to record progress on all four, we'll see how it goes!

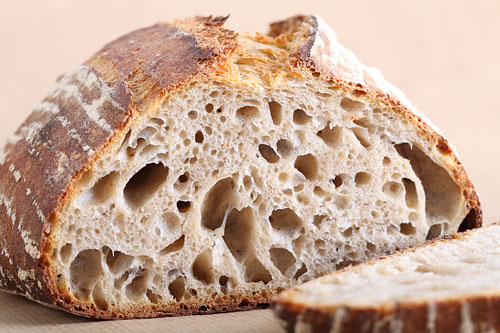
A beautiful, and completely unrelated king bolete. But look how gorgeous it is! From photonaturalist.files.wordpress.com.

Growing mushrooms at home - post 1, general approach

I've been wanting to grow my own mushrooms at home ever since I have come across this picture.
Oyster mushrooms, growing in a bucket on a kitchen counter. From www.milkwood.net
Imagine that, gourmet mushrooms, available whenever you feel like it, fresh, and inexpensive! Growing up in Russia, mushrooms were a huge thing. Everyone picked wild ones in the fall, and most people could identify dozens of edible mushrooms. 

Long story short, a few weeks ago, a few of my friends and I bought mushroom kits for indoor growing; these were shiitake, cinnamon cap, oyster, and king oyster kits, from Wylie Mycologicals, a Canadian company.

The kits come with very simple instructions - for most, the buyer has to do nothing, until small mushrooms are seen inside the bag. Then, a slit is made in the bag, and the mushrooms are allowed to grow bigger. Once they reach desired size, they are cut off the bag and used as needed. The bag is then resealed, and another flush of mushrooms will be expected after a few days. This process is repeated, until the bag feels light, as the substrate feeding the body of the mushroom, the mycelium, is spent. 
King oyster kit. How cool is that? (image from http://static.webshopapp.com/)
The magic part is that if you keep feeding the mycelium, it should, if all goes right, keep on going forever. So, for the initial price of the mushroom kit, one should, theoretically, be able to have a lifetime of free mushrooms! After reading (a lot), these are the general rules:

1) The new substrate can be made of combinations of straw, used coffee grounds, cardboard, grain, wood chips, and sawdust (usually hardwood, NOT softwood), depending on the species - different mushrooms need different foods.

2) The substrate should be pasteurized, and the container, your hands, and all the tools should be thoroughly cleaned with soap, vinegar, or peroxide. Easiest approach for the substrate - fill a large pot with water, bring to 80C, take off the burner, add the substrate, and let it sit for 1-2 h (to pasteurize, it needs to stay above 60C for 1-2 h). Let the substrate cool, strain, and you're good to go.  

3) Humidity - lots and lots of it. The new substrate should be thoroughly moist, but not soaking - the mycelium needs air, and can drown if there is too much water. While the mycelium is colonizing the new substrate, humidity should also be high. 
                                       Oyster mushrooms, grown in a laundry basket. From http://velacreations.com/.

For details an step-by-step instructions on how to make it happen, check the next mushroom post!


Tuesday, July 21, 2015

Charged up

Recently Hydro Quebec announced plans for extending their DCQC network to allow further EV road trips in la belle province. By the end of 2016, an EV will be able to travel from the Ontario border to Rivière-du-Loup (and beyond) completely stress-free. The problem, as identified in my previous post, is that the infrastructure hits the New Brunswick border and stops:

Source: AVEQ/HydroQuebec

Spaced every 45-70km like HydroQuebec's plan, the following stations could extend this network through New Brunswick on the Trans-Canada:
  • Edmundston, Grand Falls, Florenceville, Woodstock, Nackawic, Fredericton, Jemseg, Havelock, Moncton, Sackville, Cape Jourimain
Continuing the network along Route 1 with stations in Sussex, Quispamsis, Lepreau, St. Stephen

And one in Welsford to connect Saint John to Fredericton.

Map of proposed DCQC network, showing my southern bias

Connections to current networks can be made by adding stations in:
  • Cabano, QC to connect Edmundston to HydroQuebec's netowrk
  • Beddington, ME to connect St. Stephen to the enormous US network
  • Oxford, NS to connect Sackville (NB) to Truro and Halifax
Sixteen stations (+3 outside NB) would get us quite a network, but at $50-100k  per station it's unlikely that anyone is ready to step-up and cover the bill. A less ambitious network would start with stations every ~100km, which might create redundancy in the future, but gets the basic network setup:

A simple solution to cover the Trans-Canada through the province.
    Six stations might be an easier sell to the public, and is still a respectable route for the time being. Three more stations in Hampton, Welsford and Cape Jourimain would round-out southern NB, and get you to PEI and NS.

    Currently, Level 2 chargers overlap these locations a bit. The difference is speed: Level 2 is an overnight or all-day affair (4-8 hours), where DCQC is more like filling up with gasoline (admittedly while also grabbing a coffee and a bathroom break) at 30 minutes. This means long distance road trips become logistically easy, compared to the haphazard method of charging in campgrounds and homes. However, chargers at hotels in Fredericton, Moncton, Grand falls, Edmundston, and Woodstock shift the priority to getting stations in Coles Island (Sussex if you want to cover Route 1 at the same time) and Perth-Andover/Florenceville. Welsford seems like a no-brainer between Fredericton and Saint John, it's also the station that would be most useful to me (hint, hint).

    Friday, May 15, 2015

    Gardening, year 3 - starting plants from seed

    This is our third year gardening, third year of starting plants from seed, and third year of learning. In my first year, we used the regular seed starting trays you see in any store. I hated them. The plastic was flimsy, the plants got root bound, or the roots escaped into the tray below and got mangled during transplanting. The trays lasted for 2-3 uses, and then disintegrated. Not ideal.

    Seed starting trays, one of the available sizes (photo from amazon.com)
    In our second year, I used a mix of the surviving trays and toilet paper rolls - save the rolls once you're done with the toilet paper. Then in the spring, fill them tightly with potting mix, water thoroughly, and plant the seeds. Once the time comes to transplant, pop the whole thing in the ground and cover. The cardboard will disintegrate over time. This approach was pretty good for things that don't like their roots disturbed (carrots, peas). However, the rolls got moldy and unpleasant over time, and roots escaped sideways into the tray, resulting in a bit of a struggle during transplanting time.

    Ready to go (photo from gardeningclan.com)
    This year I came across the technique of air pruning, the approach where some of the plant's roots are exposed to air, after which the tips die and the root branches (here's more detail). The result is a branched, healthy root system, with no root-bound plants.

    Air-pruned roots on the left, root-bound ones on the right (photo from geoplanter.com)
    There are quite a few different containers and approaches to this, from fabric pots, to planting in shopping bags, to nursery-quality air pruning pots. To start the seeds, I tried two different approaches - one making seed starter pots out of newspaper (instructions here), and one using net cups, following the advice of the air-pruning guru, Larry Hall (here are his FB page; note that it's a closed group and you'll need to be added by the admin, and his YouTube channel).

    I bought 100 cups on Amazon (net cups). They're fairly sturdy, and should last quite a few years, especially if I'm nice to them. I made another 100 or more newspaper cups to accommodate the rest of the starters. Silly of me, I didn't do a proper control, where you would plant the same seeds in the two growing containers, to see which one does best. However, so far most of the net-cup plants did much better than the newspaper ones. I did not expect such a difference (and perhaps that's why I didn't do the control bit). But I know that I will be buying another 100-200 cups for next year's season.

    Tomato comparison - the best of the newspaper cups is on the right; the left is second-best net cup results. The very best tomatoes have already been moved to larger pots...
    One extremely helpful tip that I read about this spring was to use aluminum foil as a reflective surface between the seedlings and the rooms. When growing seedlings on windowsills, they end up bending towards the light source. To reduce bending, the plants need to be turned once or twice a day, which is a chore if you have quite a few of them. The aluminum foil does two things: 1) it doubles up the amount of light the plants receive, which results in shorter, sturdier plants, and 2) it prevents the plants from bending. As a result, the plants only need to be turned once a week, if that - I haven't turned many of my seedlings in weeks now, and they're only slightly off-center...

    My tinfoil-hat plants... Cucumber starters in this picture. The shiny side of the aluminum should be facing the window.
    The last lesson I learned in starting plants this year is that peppers are exceedingly slow. I started both peppers and tomatoes at the same time, mid-February or so, following the instructions on the seed packets. Next year I'll be starting peppers a month earlier (mid-January), and tomatoes a month later (mid-March). This should allow us to have peppers earlier in the season, and save me the issue of having plants that are too big for their homes and need transplanting into larger pots.

    Tomatoes on the left, peppers on the right. Oops.
    In the next post, I'll have some pictures about the different garden area I'm intending to use for planting all these things. Yay, spring is finally here!

    Tuesday, February 10, 2015

    Wattle and lasagna composting

    Goal - have raised beds. Price - not a whole lot, if any. Solution - alder branches, cut during the clearing of some of our property, a pile of manure sourced locally over the summer, bags of fallen leaves, provided by friends and unsuspecting people throughout Quispamsis, NB. The alder branches can be used for wattle weaving, where branches are woven together to create fences, raised beds, erosion control structures, etc.

    This is what it looks like when you know what you're doing
    We had a whole pile of alders lined up. Josh cleared some during the summer, and made me a whole pile of straight, long, medium-width branches of alders.
    A restored Templars' monastery. Can I live there?
    We also had piles of manure, and during November, we collected quite a few bags of raked leaves from the unsuspecting dwellers of Quispamsis, NB. In addition, we had a few bags collected and/or dropped off by friends (thank you, everyone!). There was also an abundance of untreated, brown cardboard from moving boxes, and some kitchen scraps made by us and also donated by relatives. To put it all together, we used the lasagna bed approach, also called sheet mulching (here and here).

    We started off by putting in the stakes for the raised bed (made out of straight-ish, thick pieces of alder).

    In the middle, we placed a layer of cardboard. Any small branches were chopped off and plopped in the middle of the bed as well. With time, they will form a tiny hugel bed (hugel who?? Hugelkultur is German for "mound culture", the art of burying a mix of wood and planting on top of the mound; this creates a self-watering, self-fertilizing planting bed). 

    Then we started placing the pieces of wattle along the border of the bed, weaving it around the stakes. Not a thing of beauty, for sure, but it should work, which is all we're after at this point. Maybe generation 2.0 will be a more aesthetically pleasing version.

    From left to right: 1) first couple of rows of wattle, 2) filled a couple of layers of compost, manure, and fallen leaves, and 3) side view of the layers within the bed. The green growth on top of the manure pile was added as "green manure" to the bed.

    Man, worms loved that manure pile.
    Once the bed is full, we placed the last layer of leaves and covered with some cardboard, so that the leaves don't blow away. And repeat. Since then, we have made another two beds, just off the side of the first two. Those were left empty and have been acting as our compost pile over the winter - we place bucketfuls of compost, cover with leaves, and walk away. In the spring, we'll be able to plant hungry vegetables, like squashes, straight into these compost beds. The more gently creatures, like tomatoes, can go into the manure-leaves beds and be happy. Cost - $free.99 for all components, help from friends - priceless, product - hopefully a happy garden :-) Thanks for everyone who has helped out!


    Monday, October 6, 2014

    50 shades of brown

    I think it was Geoff Lawton who said something along the lines of "the only way for truly sustainable farming is to build soil, so that you have more soil when you're done than when you started". This is a stark opposite to the common slash-and-burn practices and the Western favourite "soak depleted soil in pesticide and fertilizer" approach. To those who aren't sure what's wrong with using fertilizer - the health of the plants is based on the health of the system the plants are living in, and first and foremost - the health of the soil. This encompasses the mineral and humus content of the soil, AND, just as important - the multitude of organisms that are the soil life. These include fungi, bacteria, worms, insects, and whatever else. This network of living things is what makes it soil, rather than dirt.

    Keeping all this in mind, I was itching to get started making our soil a thing of beauty. As soon as we got a truck, we have started compiling our sources of organics. Main concerns were price (free, please), compatibility (you need both nitrogen-rich and carbon-rich materials), and versatility. One thing that people often miss is that currently soils are more often than not deficient in some things (due to long-term growing/grazing and selling elsewhere that removes the nutrients). Different soils will have, of course, different deficiencies. However, if you compost all of your home-grown leftovers and apply them to your own garden, thinking that you're solving your soil's issues right there, you're completely off-target. Each garden will have a different mineral content. Since you're applying a mineral-deficient compost to the same-mineral-deficient soil, you're still left with deficiency. To do fine-scale, targeted adjustments of mineral contents, it's super important to have soil tested. The broader approach is to get inputs from as many different sources as you possibly can, and hope that they will cover the spectrum of specific needs of your soil.
    Piles of free wood chips, courtesy of a tree service company not too far away 

    Which brings us to the name of the post - the more different manures, the better! Currently, we have a pile of alpaca manure, horse manure, and we should be able to pick up some chicken manure in a couple of weeks. These will be our nitrogen sources. Since different animals uptake different vitamins and minerals, the manures should have a fairly variable composition. Carbon sources will include cardboard from recycling bins, free wood chips from a tree service company, and fallen leaves from anywhere we can get them.

    Mmmm, manure... Horse in the front, alpaca in the back. Josh on the truck ;-)

    Our approach will be build raised beds using sheet composting (aka lasagna beds) this fall and next spring. Currently, we're waiting for the house construction to be over and all the heavy equipment to be gone. Once the house is built, we will put together a few raised beds. In them, we'll layer cardboard on the bottom, a layer of mixed manures, a thick layer of leaves, a bit of top soil from our own site (scraped off during driveway and house construction), and wood chips on top. All pathways in between will be mulched using cardboard and wood chips. All this good stuff will be left to overwinter and decompose, so that it's ready for planting in the spring. One of the beds will be made using compost from the stuff Josh's relatives are supplying us. I really hope it does well, so that they see what you can achieve with the power of garbage :-)

    Saturday, July 26, 2014

    Random thoughts following Arthur's 7-day power outage

    The tropical storm that caused 1-2 week power outages (depending on location) throughout New Brunswick and Nova Scotia (well over 200,000 affected customers in total) felt a little like a preview of a catastrophic event. Josh is writing a full-length blog post about his thoughts and feelings during and following the storm. This is my post, and it's short and sweet, and just includes a few of the main thoughts that came to my mind...

    Saint John, NB, the morning after the storm

    1) Out of the 7-9 days of outage in Fredericton, NB, at least 6 were perfectly sunny. So, if more people had solar power capacity, they wouldn't be up s**t creek. Our neighbours, who are off-grid, said "we wouldn't even know anything was different"; apparently, were also offering hot showers and such to friends and neighbours in need.

    2) When power was out, rural homes, which depend on wells (and hence pumps) were out of water. Which means that you need to truck bottled water for drinking, face washing, tooth brushing, and the occasional toilet flushing. Josh's parents had a pond in their back yard, so bucketing for toilet purposes was relatively easy. However, if people had to bucket water to flush their toilets every day, how long would the flush toilets system last? Why are we supporting such a fragile (and wasteful) system?

    3) From conversations we overheard: "people were actually socializing, neighbours were meeting for supper and helping each other. But only until power came on..." Seriously? That's what it takes to revert back to a normal, social life? All of our conveniences need to be gone, apparently...

    4) Why do people have so much frozen meat???

    5) Line-ups for gas and propane - the only reason things went mostly "as normal". Grocery stores were running on generators, and still some had spoiled produce and meat. People ran their home fridges on generators and cooked on propane stoves. What would happen if these fossil fuels would be either unavailable or super expensive?

    It was pretty neat and a little scary to see the changes that occur in our society under what can be considered a fairly small-scale disaster. Small scale, because we could still get around and had cheap gas to run our lives mostly as normal. But it did provide a little glimpse into the future, and when you add into the equation climate change and future oil shortages, I sure didn't like what I saw...


    Friday, July 18, 2014

    Final house plans - they exist!

    The last week or so has been pretty exciting for us. The house plans got finalized (true story!), printed, and handed off to the builder. Here's what it will look like. Eventually.

                                     South side                                                                                                              West side


    Main energy-efficient and green features, thanks to our Passive-house-certified designer (Garth Hood, from Thoughtful Dwellings, Fredericton, NB):
    1) Lots of (but not too many) windows on the south side, for good lighting throughout the day, and passive solar heating (sun heating the interior through the windows) in the winter
    2) Minimal glazing on the north (single, 2'x3' window in the bathroom) and west (single window in the kitchen), to reduce heat escape from the north side and avoid the hot afternoon sun from the west.
    3) Crazy efficient windows (see below)
    4) Crazy efficient heat recovery ventilation (HRV) system (see below)
    5) A hydronic wood gasification stove (see below)
    6) Solar panels + batteries
    7) Composting toilet
    8) Insulated Concrete Form (ICF) construction - makes for a very air-tight house

    The windows we're getting are super fancy - not only are they triple-glazed (and we get to choose the solar heat gain coefficients, which differ for south and north sides), but they also have insulated frames. The overall effect is that the inside surface is warm to the touch even in the winter, they have a huge effect on total house insulation, and make fantastic window seats. Since they're extra-fancy, they also open in two different directions:

    Fancy windows (left) and the outcome of having insulated windows and tight thermal envelope (right)

    The HRV is a Zehnder ComfoAir 200, which will be installed with an earth tube. The earth tube is as it sounds - a pipe buried underground. This pipe provides the intake air for the HRV system. Since it's underground, the incoming air is at a much more stable temperature (being heated up by the Earth's mass). Below is a graph of outside air temp (blue) and intake air temp (red). This should allow us to save a fair bit on energy to heat the incoming air to house-temperature.

    <-- Earth tube during installation      ^ Comparison of outside air temperature with                                                                        after-tube temperature

    Ahhh, the wood gasification stove. The world's least sexy name for one of the coolest things I've ever seen. In short - it has two chambers; the top one burns wood, like any normal wood stove. The lower chamber burns the exhaust from the upper chamber, which allows for higher efficiency and cleaner exhaust. In addition to heating the house directly, the stove also connects to a huge (1000 L) tank and heats the water inside it. The tank acts as storage, which can be used either for in-floor heating or heating up domestic water when the batteries are running low. Made by a German company, with distributors in Canada and US. Here's the video, skip to 2:10 past the overly-perfect German family to see the magic...

    Ze majestik vood stove

    Solar panels + batteries are pretty self-explanatory. Plus, we don't have the plans for those yet, so can't include any cool pictures. The work will be done locally, by Treefrog Ventures. The battery bank was calculated to give us about 5 days of regular-use power under overcast conditions. Between this and the wood stove, we're hoping to not need much of a generator use throughout the year. We'll see how it pans out. Part of the process is learning the systems and probably changing some bad habits.

    Composting toilet - while I've already written about it, I thought I'd reiterate. Flushing toilets make no sense. There is a Russian expression that goes "if you add a teaspoon of jam to a barrel of crap, you get a barrel of crap. If you add a teaspoon of crap to a barrel of jam, you still get a barrel of crap". Flushing toilets do exactly that - 13 L per flush until the 1990s and almost 5 L per flush since. That makes for a very, very large barrel of crap, where there is absolutely no need for it in the first place.

    Last, but not least, is ICF construction. The idea is that the insulation (rigid foam) is a part of the wall right off the bat, instead of an add-on during the construction process. Once the ICF blocks are installed, the concrete is poured, and voilà - you have reinforced, well-insulated concrete walls. Since the insulation is already there during the wall formation, the insulating envelope is tight, and the thermal performance of the house ends up being higher than with many other forms of insulation.


    ICF construction, pre-concrete pour.  

    Now that these things are in place, we're just waiting for the well digger to dig our well, and the house construction can begin!

    Friday, July 11, 2014

    Starting from scratch

    It's a very odd feeling to come to a piece of land, and realize that it's an empty canvas and you're in charge of making it look the way you dreamed. It's almost impossible to run a full list of things to do, since that would make my brain explode. Let me see: build a house. Create a beautiful, yet functional and reliable food system. Not kill each other. Hmm, shorter-term goals are probably the way to go here :-)

    So instead we're trying short to-do lists for when we spend 2-3 days at the property. In our first week, the things to do included: mow down the clearing, till garden patch, limb driveway trees and stake the driveway and house. Done, done, and done...

    We planted this year's garden with soldier beans and potatoes. We're treating this garden plot as a "year zero" experiment (as Josh calls it), or "throwaway year" as I call it. As in - if anything grows, great. If not, we're not going to be too sad about it. The soil in the clearing is mostly clay, since the clearing has been cut for (likely) many years now - the organic matter has been repeatedly stripped from it, leaving not that great a soil behind. In comparison, the soil in the forest not 20 feet away is much richer in organic, darker, and crumblier.

    In that first week we also planted black currants - we brought 2 currant plants with us from BC. I bought them from a Russian lady in Castlegar, who was swearing to me that they were special, "from Siberia". There are 3 berries on one of them, and they are darkening up fast. We'll see how special it is in just a little bit! In addition, we planted 3 rhubarb plants and a bit of mint.

    <-- rhubarb, happily growing in its new spot


    Black currants working on getting ripe        -->


    Since that first week, the list of small, yet important accomplishments got longer: moved a wild rose plant from the river, where they grow by the dozen, to our property, moved three baby trees (one goosefoot maple and two beeches) from the driveway, where they would get trampled by heavy equipment, to the edge of the clearing, made vertical potato boxes and planted them with late potatoes, built a compost bin, and filled it with a whole pile of fallen leaves left behind by Arthur, and planted pole beans, peas, arugula, and kale. Most of this work was done by Josh while I was trying hard to maintain my full-time work schedule.

    <-- vertical potato planter. Yes, they did get covered (and mulched) one the picture was taken.


    First-year compost bin. Will get more elaborate with time, but good enough for now    -->


    In the meantime, the builders just about completed the driveway to our place, which means that now we can actually drive up the driveway all the way to the house site, instead of hiking out with all of our gear. What a concept!

    <-- driveway in the making


    Local wildlife coming out after the rain. Unrelated to this post as such, but very cute :-)                          -->


    Friday, June 27, 2014

    Walking our land and some pretty pictures

    We have now successfully moved back to NB. In the past few days, we have been staying with Josh's parents, who have been most kind and helpful. We've gone to our little piece of heaven (and hard work) twice now. In the first time, we aimed to see how things were progressing, with it being summer and all, and to place temporary stakes for the locations of the well and the corners of the house + garage.

    The area is all in bloom and beautiful, such a difference from the gloomy days of fall when we first saw the property! Now, remove those pesky blood-sucking insects, and I'm officially in love :-)

    <-- Location of future garage corner. ^ view toward future house

    Here are some pictures of plants we took on that first walk while running around trying to escape the multitude of mosquitoes, black flies, and deer flies that thought we were supper...

    Highbush cranberry in bloom

    On the second visit to the property, we met with our builder, went over the general locations of things on the property, staked out the world's longest driveway, and cleared some low-hanging tree limbs from the existing driveway, in preparation for putting gravel on it next week.

    American beech, identified via FB friends...
      
    Gorgeous flowering pitcher plants by the lake... 
    So beautiful, that I was OK with getting bitten while snapping some pictures :-)

     The elusive butthole tree... And now you, too, cannot unsee it. 

    I'm really looking forward to having some plant-knowing people over to our new place and learning more about what species are growing readily around. Assuming that the driveway will be made more accessible next week, we might have a bio-ID-blitz in a couple of weeks. Rumour is there will be a bottle of (excellent) homemade red wine for the winner! 

    Monday, June 23, 2014

    Our quest for the awesome homemade sourdough bread recipe

    I've been making my own sourdough bread for about four years now. My sister and her husband got me hooked - they were making theirs for a while, and when I tried a slice, there was just no coming back. I was always a bread lover. Real bread though, the heavy, tasty kind, not the white fluff you usually get at the store.

    sanfranciscosourdough


    <-- white fluff....        ^ happy-Sima bread


    In the first two years, bread making was a struggle - the dough had to be kneaded, and left to rise twice at somewhat specific intervals, which made it harder to make during the workweek. The center did not always bake through, while the outside sometimes got too crusty. Then, two years ago, everything changed. I went back to my sister, and noticed that she did no kneading. So this time I listened carefully when she explained the process. I also combined her recipe with this one, from a blog written by a friend. The resulting recipe is what we've been following for the past two years, happy and content. Work time: 10 mins. Price: pennies. Results: awesome bread.

    Not only that, but I've spread the goodness - I shared my sourdough starter with at least four people in the past year or so. One of them, a friend from work, has done no baking before. Within a few weeks, he was raving about the awesome bread he was getting. Another share, which happened on our travel from BC to NB, was at a bed and breakfast in Ontario. The hosts let me feed my starter in their kitchen and asked for a bit for themselves. A few days later, I got this email:

    " I just wanted to tell you how much we’re enjoying the gift of your starter.  I just put together the 3rd loaf and as yet have not started adding anything as we’re enjoying it so much just as it is!"

    Anyway, enough talk, here's the recipe. It requires a starter. Which you can get from someone you know has one (like myself) or make your own (takes flour, water, and about 5 mins of work / day for a week or so, here's a recipe for a rye starter).

    Things you'll need: whole wheat flour, white flour, starter, salt, water, large container with a lid (plastic bowl, large pot, whatever, as long as the lid fits well), spoon.

    1) Combine 1.5 cups of whole wheat, 1.5 cups of white unbleached wheat, and a sprinkle of salt in a large bowl.

    2) Mix the starter and pour in most of it into the bowl; leave about 1 inch of starter in the jar

    3) Start mixing the dough, add water as needed to get a thick, but droopy dough. You don't need to knead at all, I only use a regular spoon to mix it; so if it's too difficult, add a little water. Cover and set on the counter to rise. You’re basically done. At this stage I also add sunflower seeds, walnuts, crushed chili peppers, olives, oregano, and all kinds of stuff, depending on the mood.

    4) Add 1 cup of whole wheat to the starter, and add enough water to make it liquidy again. Stir well, cover with a cloth and leave on the counter for a few hours (I leave it out while the dough in the bowl is rising). That's when the starter is eating and getting bigger for next time. After the eating period (= when you put the bread into the oven), put it in the fridge (covered with a cloth, because the starter still needs to breathe). The starter stays in the fridge between breads; you just use it as is, cold and all. If it starts smelling weird, gunks up on the top or whatever, just scrape and discard the gunk, stir the starter, pour most out, feed, and let sit for a few hours to get bubbly again.

                                                                                          
    Left - just-mixed starter. Right - starter after a night of eating on the counter. Most of the flour is on top, trapped between gas bubbles from the starter's breathing.

    5) Once the dough in the bowl is quite bubbly (2-3 h in the sun in the summer, or ~ 12 h in the cold of the winter), it’s time to bake.


    6) Preheat the oven to 425 F (220 C, different ovens might be different; slightly change heat / time as needed through experimentation). Oil and flour a bread pan (or a cookie sheet, or a muffin tray). Gently pour the dough in, try to not squish the bubbles too much. Bake for 40 mins or until the crust is golden to your liking.

    As muffins or ciabatta-like, this bread seriously rocks.

    Let it sit for a few minutes before you cut it. If you can wait, that is :-)


    Fresh from this morning